JodGig AI Database Setup (jodgig-ai)
This page is the build runbook for the jodgig-ai instance and its nightly job. The architecture and the reasons behind it live on the main page — read that first. This page is only the "how", in order, with a check after every step.
State as of 2026-08-29: every step on this page is done. The clean room and the AI Metabase are live. This page stays as the record of how, and as the recipe if any piece ever needs rebuilding. Track remaining work in jodgig-api#2691.
Where Everything Lives
Read this section before any step below. The whole clean room is eleven files in one folder in git, plus six places on one server. There is nothing else to find.
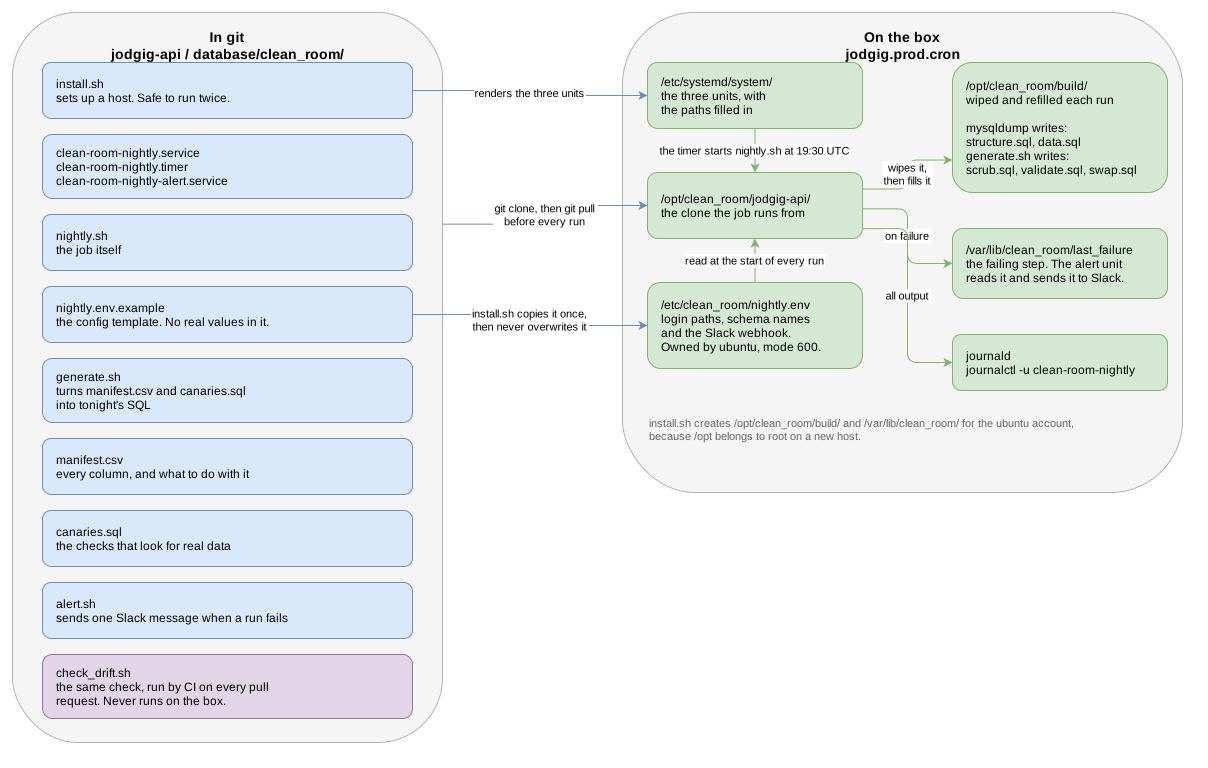
The picture has two sides.
- The left side is the repository. Every file lives in
jodgig-apiunderdatabase/clean_room/. This is the only place where we edit anything. A change to any of these files reaches the server by itself, becausenightly.shrunsgit pullbefore it does anything else. - The right side is the server
jodgig.prod.cron.install.shputs four things there: the three systemd units, the config file, and the two folders the job writes to. Everything else the job needs is already inside the clone.
These are the six places on the server:
| Path | What it holds | Who creates it |
|---|---|---|
/opt/clean_room/jodgig-api/ | A clone of jodgig-api. The job runs from here. | A person, once, with git clone |
/etc/clean_room/nightly.env | Login paths, schema names, and the Slack webhook. The database passwords are not here: mysql_config_editor keeps those in the ubuntu account's own files. | install.sh copies it from nightly.env.example when it is missing. It never overwrites a file that exists. |
/etc/systemd/system/ | The three units, with the paths filled in. | install.sh, every time it runs |
/opt/clean_room/build/ | Tonight's SQL files. Wiped and refilled on every run. | install.sh creates the folder, nightly.sh fills it |
/var/lib/clean_room/last_failure | The step that failed, so the alert can name it. | install.sh creates the folder, nightly.sh writes the file |
| journald | Every line the job prints. Read it with journalctl -u clean-room-nightly. | systemd |
One night runs like this:
- The timer starts
clean-room-nightly.serviceat 19:30 UTC, which is 03:30 SGT. nightly.shrunsgit pull, then starts itself again with the new code.- It checks that
mysql,mysqldump,gitandawsall exist, and stops in the first second if one is missing. - It fills
/opt/clean_room/build/with the dumps and the generated SQL, loads them intostage, scrubs, and checks. - If every check returns 0, one
RENAME TABLEpublishes the result asjodgig_ai.
If any step fails, nothing is published. The failing step is written to /var/lib/clean_room/last_failure, and the OnFailure unit sends it to Slack.
Step 1: Parameter Group
Create a parameter group jodgig-ai-mysql84 with family mysql8.4 and set:
| Parameter | Value | Why |
|---|---|---|
max_execution_time | 30000 | MySQL kills any SELECT that runs longer than 30 seconds. Safe because only this workload runs on the instance. |
restrict_fk_on_non_standard_key | 0 | MySQL 8.4 refuses two of our legacy foreign keys (jodgig-api#2695). This keeps the old 8.0 behaviour so the schema loads. |
Two traps we hit:
- The console's family dropdown also offers
aurora-mysql8.4. That is a different engine. Pick plainmysql8.4, or the two parameters will not exist and the group cannot attach to the instance. - Attaching a different parameter group to an instance always needs one reboot, even for dynamic parameters. Changing values inside the already-attached group applies immediately.
Step 2: The Instance
jodgig-ai: RDS MySQL 8.4.11, db.t4g.small, single-AZ, 30 GB gp3, subnet group prod-rds.private-subnets, security group sg-0cedd07d123983f5e (3306 from the private subnets only), not publicly accessible, backups 0 (the copy is rebuilt nightly — backups protect state you cannot recreate, and this state we recreate every night). Leave "initial database name" empty: nightly.sh creates every schema itself.
Why 8.4 and not 8.0 like production: RDS ended standard support for MySQL 8.0 in July 2026, so a new 8.0 instance costs Extended Support money every month. The nightly copy is plain SQL text, so dumping from 8.0 and loading into 8.4 works. Do not attach sg-0f60611862c58b27a (see jodgig-api#2696).
Endpoint: jodgig-ai.cnymncxoyulc.ap-southeast-1.rds.amazonaws.com
Step 3: Reboot, Then Check
After attaching the parameter group, reboot once. The check (from any private-subnet box):
mysql -h jodgig-ai.cnymncxoyulc.ap-southeast-1.rds.amazonaws.com -u <master-user> -p \
  -N -e "SELECT VERSION(), @@max_execution_time, @@restrict_fk_on_non_standard_key"
Must print 8.4.11 30000 0. Until it does, the nightly job cannot load the schema.
Step 4: Database Users
Three users. Generate a fresh password for each (openssl rand -base64 24) and store them in the password manager, nowhere else. Before typing passwords into the mysql client, run export MYSQL_HISTFILE=/dev/null — the client otherwise writes every statement, passwords included, to ~/.mysql_history.
On the writer (jodgig) — CREATE USER and GRANT are ordinary statements, so replication copies them to the replica by itself:
CREATE USER 'etl_read_only'@'10.0.%' IDENTIFIED BY '<fresh-password>';
GRANT SELECT, SHOW VIEW ON jodgig.* TO 'etl_read_only'@'10.0.%';
On jodgig-ai (as the master user):
CREATE USER 'etl_admin'@'10.0.%' IDENTIFIED BY '<fresh-password>';
GRANT ALL PRIVILEGES ON `stage`.* TO 'etl_admin'@'10.0.%';
GRANT ALL PRIVILEGES ON `jodgig_ai`.* TO 'etl_admin'@'10.0.%';
GRANT ALL PRIVILEGES ON `jodgig_ai_old`.* TO 'etl_admin'@'10.0.%';

CREATE USER 'ai_read_only'@'10.0.%' IDENTIFIED BY '<fresh-password>' WITH MAX_USER_CONNECTIONS 20;
GRANT SELECT ON `jodgig_ai`.* TO 'ai_read_only'@'10.0.%';
Notes:
- Granting on a schema that does not exist yet is fine. Grants are rows in a table, checked at query time. That is what lets
nightly.shdrop and recreatestageevery night. ai_read_onlygets no grant onstage, so agents can never read the raw copy, even mid-run.- The host pattern
10.0.%limits all three users to the production VPC. - MySQL has no
SHOW USERS. To list:SELECT user, host FROM mysql.user ORDER BY user;
The check: SELECT user, host FROM mysql.user WHERE user = 'etl_read_only'; on the replica endpoint — seeing the user there proves the grant replicated, and the replica is where etl_read_only logs in every night.
Step 5: IAM Role for the Success Metric
The cron box reports "I succeeded" to CloudWatch after every good night. An alarm fires when the reports stop for 36 hours — that catches a dead box, which a failure alert cannot, because a dead box sends nothing. The box needs exactly one permission for this.
In the web console:
- IAM → Roles → Create role.
- Trusted entity type: AWS service. Use case: EC2 ("Allows EC2 instances to call AWS services on your behalf"). Next. This generates the trust policy:
{
  "Version": "2012-10-17",
  "Statement": [
    {
      "Effect": "Allow",
      "Principal": { "Service": "ec2.amazonaws.com" },
      "Action": "sts:AssumeRole"
    }
  ]
}
- Add permissions: skip this screen (Next).
- Role name:
jodgig-clean-room-cron. Create role. - Open the role → Permissions → Add permissions → Create inline policy → JSON tab → paste:
{
  "Version": "2012-10-17",
  "Statement": [
    {
      "Effect": "Allow",
      "Action": "cloudwatch:PutMetricData",
      "Resource": "*",
      "Condition": { "StringEquals": { "cloudwatch:namespace": "JodGig/CleanRoom" } }
    }
  ]
}
Name it put-clean-room-metric. (Resource must be * because PutMetricData does not support resource-level restriction — the Condition is the real fence: the box can write only into the JodGig/CleanRoom namespace.)
- EC2 console → Instances →
jodgig.prod.cron→ Actions → Security → Modify IAM role → pickjodgig-clean-room-cron→ Update. No restart needed.
The check, on the box (the first command can take a minute after attaching):
aws sts get-caller-identity          # must show ...assumed-role/jodgig-clean-room-cron/...
aws cloudwatch put-metric-data --region ap-southeast-1 \
  --namespace JodGig/CleanRoom --metric-name SetupTest --value 1
No keys are stored on the box — the instance profile hands out short-lived credentials through the instance metadata. That is the point of doing it this way.
Step 6: The Server
On jodgig.prod.cron (Ubuntu 24.04, UTC):
# aws CLI v2 for arm64 (done 2026-08-27, v2.36.32)
curl "https://awscli.amazonaws.com/awscli-exe-linux-aarch64.zip" -o /tmp/awscliv2.zip
unzip -q /tmp/awscliv2.zip -d /tmp && sudo /tmp/aws/install

# Dedicated clone — nightly.sh runs `git pull` on it, so it must not share
# a checkout with any deploy tooling.
sudo mkdir -p /opt/clean_room && sudo chown $(whoami) /opt/clean_room
git clone git@github.com:jod-app/PORTAL_V2_BACKEND_GLOBAL.git /opt/clean_room/jodgig-api
cd /opt/clean_room/jodgig-api && git checkout merge-prod

# Credentials, stored obfuscated by mysql_config_editor (each prompts once).
# The MySQL client on this box is 8.0.x and the server is 8.4 — that is fine;
# only the server's version matters, and this pairing is what we tested.
mysql_config_editor set --login-path=clean_room_replica \
  --host=jodgig-replica-1.cnymncxoyulc.ap-southeast-1.rds.amazonaws.com --user=etl_read_only --password
mysql_config_editor set --login-path=clean_room_ai \
  --host=jodgig-ai.cnymncxoyulc.ap-southeast-1.rds.amazonaws.com --user=etl_admin --password
Then the config file and the two folders the job writes to. Step 8 does all of this for you, but the first manual run in step 7 happens before we put the job on a schedule, so create them by hand now:
sudo install -d -m 0755 /etc/clean_room
sudo install -o ubuntu -m 0600 \
  /opt/clean_room/jodgig-api/database/clean_room/nightly.env.example \
  /etc/clean_room/nightly.env
sudo install -d -o ubuntu -m 0755 /opt/clean_room/build /var/lib/clean_room
Then open /etc/clean_room/nightly.env and fill in SLACK_WEBHOOK_URL, the incoming webhook for the alert channel. Never put that value in git. Check that every other line still matches this box.
The file is owned by the account that runs the job (ubuntu), mode 600. Not root: mode 600 means only the owner can read it, and the reader is the job. A root-owned 0600 file locks the job out. We made that mistake once.
/opt belongs to root on a new host, so the job cannot create those two folders itself. That is why they are made here.
The checks, all three before the first run:
mysql --login-path=clean_room_replica -N -e \
  "SELECT COUNT(*) FROM information_schema.tables WHERE table_schema='jodgig'"   # ~72
mysql --login-path=clean_room_ai -N -e \
  "SELECT VERSION(), @@max_execution_time, @@restrict_fk_on_non_standard_key"    # 8.4.11  30000  0
aws sts get-caller-identity                                                      # the role from step 5
Step 7: First Manual Run
Run it watched, before the job goes on a schedule:
bash /opt/clean_room/jodgig-api/database/clean_room/nightly.sh /etc/clean_room/nightly.env
Expected: a few minutes (about 2 GB of rows), then all N validate checks returned 0 and OK: clean room rebuilt and published. Any failure stops before publish and says which step died.
Then the honest test, from CloudBeaver connected as ai_read_only: browse jodgig_ai for ten minutes and try to find one real name, phone number, NRIC, or bank account. If you find one, the job is wrong — stop and report it, do not explain it away.
Step 8: Install the Timer
Only after step 7 passes. One command puts the job on a schedule:
sudo bash /opt/clean_room/jodgig-api/database/clean_room/install.sh
It is safe to run twice. Run it again after any change to the units, and it reports what changed and what it left alone. It does five things:
- Creates
/etc/clean_room/nightly.envfrom the template, if the file does not exist yet. Step 6 already made it, so this run leaves it alone. It never overwrites a config file that exists. - Creates
/opt/clean_room/build/and/var/lib/clean_room/for theubuntuaccount, if they do not exist yet. - Writes the three units into
/etc/systemd/system/, with the paths filled in. - Enables the timer, then checks that it became active.
- Removes the old crontab entry, but only after step 4 succeeded. A host must never end up with no schedule at all.
The checks:
systemctl list-timers clean-room-nightly.timer   # shows the next run
sudo systemctl start clean-room-nightly          # run it once now
journalctl -u clean-room-nightly -f              # watch it
The default is 19:30 UTC, which is 03:30 SGT, because the box runs on UTC. To use a different time, pass it in: sudo RUN_TIME=21:00:00 bash install.sh.
Why a Timer and Not a Crontab Entry
We used a crontab entry until 2026-08-29. It sent its output to a log file with >>, and the ubuntu account cannot create a file in /var/log. cron gives the whole line to /bin/sh -c, and a shell opens every redirect before it starts the program. The open failed, so nightly.sh never ran, and it left no log to say why. The job did not run for three nights and nobody noticed. See jodgig-api#2704.
A systemd unit removes that whole class of problem:
| Problem with the crontab entry | What the unit does instead |
|---|---|
| The output goes to a file the account may not be able to create. | The output goes to journald. There is no redirect and no log file to own. |
| Nothing shows whether the job ran. | systemctl list-timers shows the next run. journalctl -u clean-room-nightly shows every past run. |
cron gives the job PATH=/usr/bin:/bin, and aws lives in /usr/local/bin. | The unit sets its own PATH. nightly.sh also sets it, so both are correct on their own. |
| A job that never starts cannot send its own alert. | OnFailure= starts clean-room-nightly-alert.service, which sends the alert instead. |
One value in clean-room-nightly.service is worth knowing about. TimeoutStartSec=3600 looks unnecessary, but a Type=oneshot service is killed after 90 seconds by default on Ubuntu. A full rebuild takes 10 to 15 minutes, so without that line systemd would kill the job during the dump every night.
Step 9: The Missing-Success Alarm
CloudWatch alarm on JodGig/CleanRoom / NightlySuccess: period 12 hours, statistic Sum, 3 of 3 datapoints breaching, treat missing data as breaching — so it fires after 36 hours of silence. Alarm action: the SNS topic that reaches Slack. Create only after the first successful run has produced the metric.
Step 10: Update the Docs
When each step lands, update the status line on the main page and tick the boxes in jodgig-api#2691.
Step 11: The AI Metabase App Database
The AI Metabase stores its own settings and accounts in a new Postgres database on the existing metabase RDS. Create it before starting the container — Metabase does not create its own app database. Skip this and the container restarts forever (we did this; docker ps showed "Created 3 minutes ago, Up 2 seconds" — a young container with a tiny uptime is a crash loop).
sudo apt-get install -y postgresql-client
psql -h metabase.cnymncxoyulc.ap-southeast-1.rds.amazonaws.com -p 5432 -U techmetabase -d postgres
CREATE DATABASE metabase_ai OWNER techmetabase;
(-d postgres because you cannot connect into a database that does not exist yet — you borrow the always-present maintenance database to issue the CREATE.)
Step 12: The Container
On jod.prod.metabase:
sudo docker run -d -p 3001:3000 \
  -e "MB_DB_TYPE=postgres" \
  -e "MB_DB_DBNAME=metabase_ai" \
  -e "MB_DB_PORT=5432" \
  -e "MB_DB_USER=techmetabase" \
  -e "MB_DB_PASS=<the app db password>" \
  -e "MB_DB_HOST=metabase.cnymncxoyulc.ap-southeast-1.rds.amazonaws.com" \
  -e "MB_SITE_URL=https://mcp.teamjod.app" \
  -e "JAVA_TIMEZONE=UTC" \
  -e "JAVA_OPTS=-Xmx2g" \
  --restart unless-stopped \
  --name metabase-ai metabase/metabase:<pinned version>
Why each line that is easy to get wrong:
-p 3001:3000— the main Metabase holds host port 3000. Two containers cannot bind one host port.MB_SITE_URL— the sign-in flow breaks without it. Set it at first boot.--restart unless-stopped— without it, a box reboot silently leaves the AI Metabase down, and nothing alarms on that.- Pin a version, never
latest— both containers here saymetabase/metabase:latestbut were pulled weeks apart, so they run different actual versions wearing the same label. Pin, and upgrade on purpose. - All state lives in the
metabase_aiPostgres database, so the container itself is disposable:docker rmloses nothing.
The checks: sudo docker logs -f metabase-ai until "Metabase Initialization COMPLETE", then curl -s localhost:3001/api/health → {"status":"ok"}, then free -h and sudo docker stats --no-stream — read available in free, not free (Linux fills idle RAM with disk cache and returns it on demand). Verified 2026-08-27: ~4.4 GB available with all three containers up.
Step 13: Claim the Admin Seat, Then the Domain
Order matters. A fresh Metabase that has not finished first-time setup shows its setup wizard to whoever visits first, and the wizard creates the admin account. So: wizard first, public DNS second.
- From a laptop:
ssh -L 3001:localhost:3001 jod.prod.metabase, browsehttp://localhost:3001, complete the wizard. (Thelocalhostin the middle is evaluated on the box — the tunnel makes your laptop's port 3001 behave as the box's.) - Security group: on
sg-0ec421dd1e6fe334e, allow TCP 3001 from10.0.0.0/20and10.0.16.0/20— a mirror of the main Metabase's 3000 rule. Without it, haproxy marks the backend DOWN and serves 503. - haproxy on
jod.prod.haproxy: infrontend web-https,acl is_mcp_teamjod_domain hdr(host) -i mcp.teamjod.app+use_backend metabase_ai if is_mcp_teamjod_domain; abackend metabase_aiwithserver metabase 10.0.137.132:3001 check. TLS ends at haproxy on the*.teamjod.appwildcard, so no new certificate. Validate before reloading:sudo haproxy -c -f /etc/haproxy/haproxy.cfg, thensudo systemctl reload haproxy(reload, not restart — existing connections survive). - Cloudflare, zone
teamjod.app: record type A, namemcp, value13.251.207.51(the haproxy Elastic IP), proxy status DNS only (grey cloud). Grey, not orange: MCP connections are long-lived and sometimes quiet, and Cloudflare's proxy cuts idle connections after about 100 seconds — a failure you cannot see from either end. Watch the zone: it is easy to create the record in the wrong zone (we did) and easy to leave Cloudflare's default proxied setting on (we did that too).dig +short mcp.teamjod.appmust return exactly13.251.207.51.
Step 14: Configure and Verify
In the AI Metabase admin: add the one data connection (JodGig Data → MySQL → jodgig-ai endpoint → database jodgig_ai → user ai_read_only), delete the Sample Database, then Admin → AI: features on, no provider, no API key, MCP server on.
The checks, from anywhere on the internet:
curl -s https://mcp.teamjod.app/api/health          # {"status":"ok"}
curl -s https://mcp.teamjod.app/api/metabase-mcp    # 401 "Authentication required" — the locked door
The 401 is the correct answer for a stranger: reachable is not usable. A 404 there means the MCP toggle is off. The server supports OAuth dynamic client registration (see /.well-known/oauth-authorization-server — it lists /oauth/register), so Claude connectors need no client ID or secret.
Then one AI Metabase account per member (Admin → People) and the member flow on Connect your AI agent. Verified end to end with Claude Desktop on 2026-08-27.